Replacing lid switch on whirlpool washing machine
Replacing lid switch on whirlpool washing machine. A lid switch is an important component of a washing machine that helps to ensure that the appliance is operating safely and efficiently.
The lid switch prevents the washing machine from operating when the lid is open, helping to prevent accidents and injuries.
If the lid switch on your Whirlpool washing machine is not functioning correctly, it will need to be replaced. In this article, we’ll explore the steps involved in replacing the lid switch on a Whirlpool washing machine.
Replacing lid switch on whirlpool washing machine
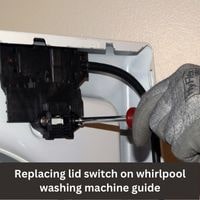
Here is a step by step guide on replacing lid switch on whirlpool washing machine:
Step 1: Gather your tools and materials
Before you begin, you’ll need to gather the following tools and materials:
- Screwdriver
- Washing machine lid switch
- Pliers
Step 2: Disconnect the power to the washing machine
To ensure your safety, it’s important to disconnect the power to the washing machine before you begin any repairs. Unplug the washing machine or flip the circuit breaker that controls the outlet.
Step 3: Remove the washing machine’s control panel
To access the lid switch, you’ll need to remove the washing machine’s control panel. Depending on your model, the control panel may be located on the top or front of the appliance. Consult your user manual for specific instructions on how to remove the control panel.
Step 4: Locate the lid switch
Once you have access to the inside of the washing machine, you should be able to locate the lid switch. The lid switch is typically located near the top of the appliance, near the door. It will be connected to the control panel by a wiring harness.
Step 5: Disconnect the wiring harness
Use the pliers to gently loosen the wiring harness from the lid switch. Be careful not to damage the wires or the connectors.
Step 6: Remove the lid switch
Use the screwdriver to remove the screws that secure the lid switch to the washing machine. Once the screws are removed, you should be able to lift the lid switch out of the appliance.
Step 7: Install the new lid switch
Take the new lid switch and place it into the opening where the old one was located. Use the screwdriver to secure the lid switch to the washing machine.
Step 8: Reconnect the wiring harness
Use the pliers to gently secure the wiring harness to the new lid switch. Be sure to match the wires to the corresponding terminals on the switch.
Step 9: Replace the control panel
Once the new lid switch is installed and the wiring harness is securely connected, you can replace the control panel. Consult your user manual for specific instructions on how to do this.
Step 10: Test the washing machine
Before you put your tools away, be sure to test the washing machine to ensure that it’s functioning properly. Turn the power back on and run a test load of laundry to ensure that the washing machine is operating correctly.
FAQs
Why do I need to replace the lid switch on my washing machine?
There are several reasons why you might need to replace the lid switch on your washing machine. The most common reason is if the switch is not functioning correctly, which can prevent the washing machine from operating properly.
Other reasons for replacement may include physical damage to the switch or a malfunctioning switch that is causing the washing machine to operate improperly.
Can I replace the lid switch myself?
In most cases, replacing the lid switch on a washing machine is a task that can be easily tackled by most homeowners.
However, if you’re not comfortable working with electrical wiring or if you’re not sure how to access the lid switch on your washing machine, it’s always a good idea to consult a professional.
What tools do I need to replace the lid switch?
To replace the lid switch on a washing machine, you’ll need the following tools:
- Screwdriver
- Pliers
You’ll also need a replacement lid switch.
How long does it take to replace the lid switch?
The length of time it takes to replace the lid switch on a washing machine will depend on your experience level and the specific configuration of your appliance. However, in most cases, the process should take no more than an hour or two.
Is it dangerous to replace the lid switch?
There is some risk involved in replacing the lid switch on a washing machine, as you’ll be working with electrical wiring and potentially disassembling the appliance.
To minimize the risk of injury, it’s important to disconnect the power to the washing machine before you begin and to follow all safety precautions. If you’re not comfortable handling the task yourself, it’s always a good idea to consult a professional.
Conclusion
Replacing the lid switch on a Whirlpool washing machine is a task that can be easily tackled by most homeowners. By following the steps outlined above, you can ensure that your washing machine is operating safely and efficiently, protecting your home and your family from potential hazards. While the process may require some disassembly and basic knowledge of electrical wiring, with the right tools and some patience, it’s a task that can be easily completed in an afternoon.
Related Guides